This Guide will show you how to process multiple avs
files to dvd ready video and audio using HCbatchGUI.
HCbatchGUI is a frontend GUI that uses HCenc to
process video, batchDGpulldown,
ssrc for audio resampling,
and Aften for audio encoding. HCbatchGUI is still
in early development. You can follow its development by clicking
here
Tools required
HCbatchGUI ~ Found on the HCenc download page in the middle of the page under
Other Info. Alternately you can go directly to the download page
http://sourceforge.net/projects/hcbatchgui
fitcd ~ Used to create simple avs script files for you.
Avisynth ~ Used to frameserve your avi file to
HCbatchGUI
gspot ~ Used to get your avi files specifications.
One note. You will get errors if
the source directory had parentheses ( ) in the directory name. i.e. C:\
whatever (stuff)\notgood\
The parentheses will cause the batch to not want to start right. It's okay to
have parentheses in the filenames just not the directory name. Make sure you
dont put any special characters in your directory names.
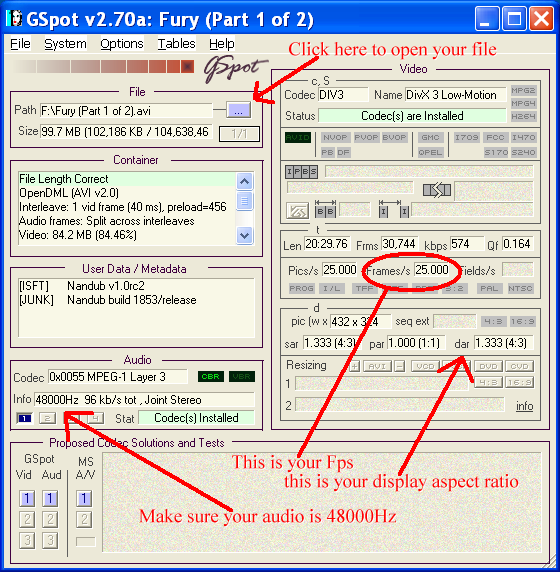
Step one open your avi file(s) in gspot taking note of the
aspect ratio (16:9 widescreen or 4:3 fullscreen) ,the
Fps (frames per second), and the audio rate.
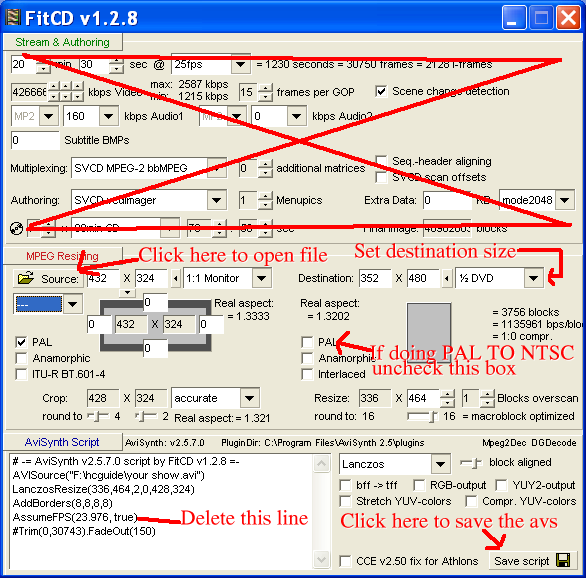
Next open your avi in fitcd. This is a wonderful little app that writes your
avisynth script for you. Choose your destination size. For this project I am
converting PAL to NTSC
352 x 480 (note that if you are
doing a pal to ntsc conversion fitcd will add assumefps(23.976) to your script.
You need to delete that line). If your avi is widescreen then check the
anamorphic box. If your avi is capped from tv it may
be interlaced. If so check the interlaced box. If
you downloaded the avi it is more than likely not interlaced. When done click
save script. Repeat this for each avi you have. If HCenc gives you the Error
"wrong colorspace" you will need to add
converttoyv12() to your avisynth script(s).
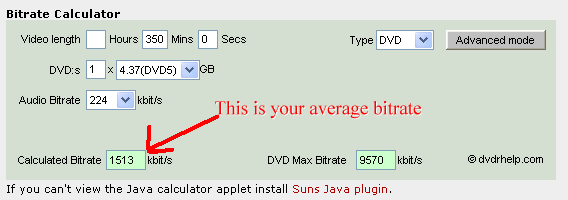
You are now about ready to process your video and audio. Open the
Videohelp.com bitrate calculator. Put in the video length ( if more than one
video then add up the time and put that figure into the calculator) and set the
audio rate to what you will encode audio at (224 kbps is good for 2 channel
audio). You now have your average bitrate to encode to (it is a good idea to use
a slightly lower~like 25kbs less~ rate than calculated to allow for authoring
overhead).
You are now ready to process the video and audio using HCbatchGUI.
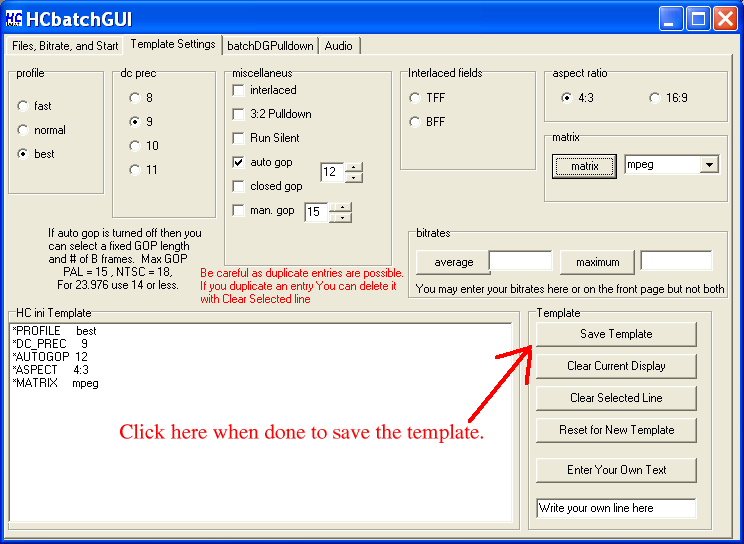
First you need to set up a template for the encode. Be
careful when setting up the template as duplicate entries are possible. If you
do duplicate an entry you can delete the duplicate by selecting it then pressing
the "Clear Selected Line" button. The most important settings for you to
check are Profile (I suggest best), dc prec (9 is good for most), autogop ( If
unsure what to set leave it at default 12), aspect ratio, Matrix (i suggest
mpeg). You can also save your bitrates to the template however I suggest to
leave that line blank so that you can use this basic template for other projects
with the same specs). When done click save template.
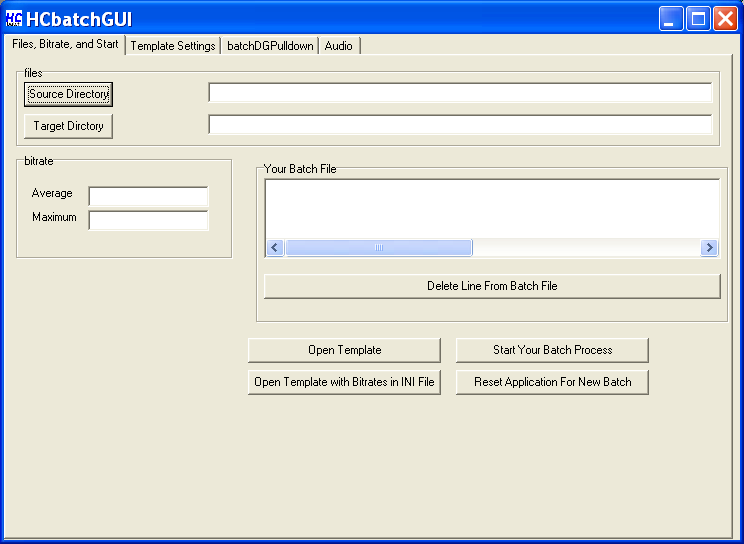
Next go to the first page and set your source directory (where your avs files
are), target directory (where you will save your m2v
video files), and bitrate (if you didn't add that to the template). Then click
either "Open Template" (if you entered the bitrate on the front page) or "Open
Template with Bitrates in INI File" (if you added the bitrate to your template).
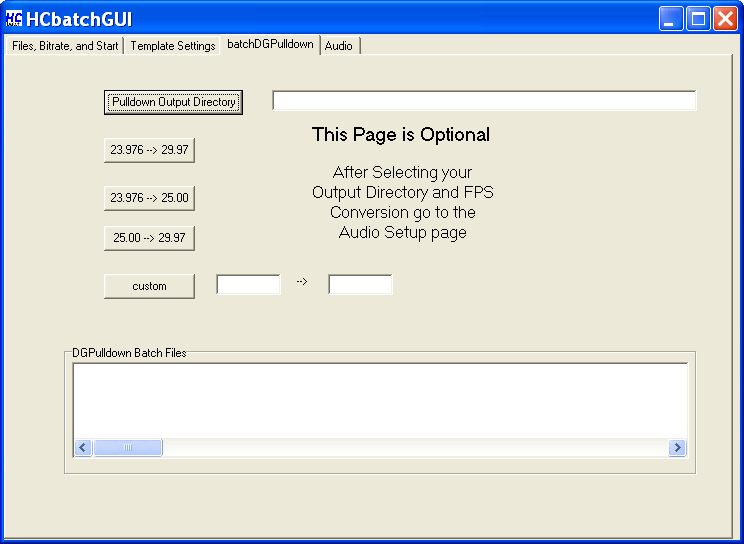
Now since we are going to do a pal to ntsc conversion we will go to the
batchDGpulldown page. This is a pretty easy setting as all there is to set is
the directory you want to save the converted files to and then select the fps
conversion button ( in this case 25.00 --> 29.97).
Finally you need to set up the audio. First select your AC3 output directory.
Next add dithers if needed (leave at zero if unsure). Your sampling rate will be
resampled to 48k by ssrc for you automatically. Next select your AC3 bitrate.
Next select whether this will be a 2 channel encode, Upmix from 2 channel to 5.1
channel, or a 5.1 channel encode. Finally all that is left is to go to the first
page and press the "Start Your Batch Process" button.
Your files will now be processed by HCenc, Wavi, ssrc, and aften. Throughout the
process you will see a dos box show up on the task bar.
DO NOT close that box because it will terminate your batch. When you no
longer see a dos Box on the task bar the process is finished. You can now author
the encoded files to dvd with your favorite dvd authoring program.
الأربعاء، 11 مارس 2009
Batch process video and audio.

الاشتراك في:
تعليقات الرسالة (Atom)
ليست هناك تعليقات:
إرسال تعليق