الأربعاء، 11 مارس 2009

DVD to iPoD/PSP/Cell phone/PCP including subtitles...

How to convert DVD to a portable format including burntin / burned / permanent subtitles. DVDFab is one of the best rippers and if you buy the full version you get a very good DVD to portable converter also.

Tools required
DVD Fab Platinum ($50 but free trial available )

Guide
Select the source, either directly from your dvd drive or open a iso,img,nrg iso image.
Select DVD to iPOD or PSP or cell phone
Select the audio track and subtitle track you want to keep
Click on the Advanced Title Settings if you want to select custom chapters
Hit Next


You can now start encode or configure output file size, video frame size and other stuff
Click Configure to adjust the output file size under the Bitrate tab. You can also adjust profiles at the top right drop down list, I use ipod.h264 for ipod video for better video quality.


Converting
Waaaait


Test play the video file in a software player, I use Media Player Classic together with ffdshow and haali media splitter. Or use VideoLan Media Player.


Add the mp4 to your portable device.

10 DVD Newbie Tips

How to set region of drive, set DMA, CPU and Memory testing, 4GB file limitation, dvd ripping speed, dvd software available, ASPI layer, DVD Size, quality of DVD mediaLinkhttp://www.mrbass.org/dvdnewbie/

Batch process video and audio.

This Guide will show you how to process multiple avs
files to dvd ready video and audio using HCbatchGUI.
HCbatchGUI is a frontend GUI that uses HCenc to
process video, batchDGpulldown,
ssrc for audio resampling,
and Aften for audio encoding. HCbatchGUI is still
in early development. You can follow its development by clicking

here


Tools required

HCbatchGUI ~ Found on the HCenc download page in the middle of the page under
Other Info. Alternately you can go directly to the download page

http://sourceforge.net/projects/hcbatchgui


fitcd
~ Used to create simple avs script files for you.


Avisynth
~ Used to frameserve your avi file to
HCbatchGUI


gspot
~ Used to get your avi files specifications.


One note. You will get errors if
the source directory had parentheses ( ) in the directory name. i.e. C:\
whatever (stuff)\notgood\

The parentheses will cause the batch to not want to start right. It's okay to
have parentheses in the filenames just not the directory name. Make sure you
dont put any special characters in your directory names.


Step one open your avi file(s) in gspot taking note of the
aspect ratio
(16:9 widescreen or 4:3 fullscreen) ,the
Fps (frames per second), and the audio rate.


Next open your avi in fitcd. This is a wonderful little app that writes your
avisynth script for you. Choose your destination size. For this project I am
converting PAL to NTSC
352 x 480 (note that if you are
doing a pal to ntsc conversion fitcd will add assumefps(23.976) to your script.
You need to delete that line)
. If your avi is widescreen then check the
anamorphic box. If your avi is capped from tv it may
be interlaced. If so check the interlaced box. If
you downloaded the avi it is more than likely not interlaced. When done click
save script. Repeat this for each avi you have. If HCenc gives you the Error
"wrong colorspace" you will need to add
converttoyv12()
to your avisynth script(s).


You are now about ready to process your video and audio. Open the

Videohelp.com bitrate calculator
. Put in the video length ( if more than one
video then add up the time and put that figure into the calculator) and set the
audio rate to what you will encode audio at (224 kbps is good for 2 channel
audio). You now have your average bitrate to encode to (it is a good idea to use
a slightly lower~like 25kbs less~ rate than calculated to allow for authoring
overhead).


You are now ready to process the video and audio using HCbatchGUI.


First you need to set up a template for the encode. Be
careful when setting up the template as duplicate entries are possible. If you
do duplicate an entry you can delete the duplicate by selecting it then pressing
the "Clear Selected Line" button
. The most important settings for you to
check are Profile (I suggest best), dc prec (9 is good for most), autogop ( If
unsure what to set leave it at default 12), aspect ratio, Matrix (i suggest
mpeg). You can also save your bitrates to the template however I suggest to
leave that line blank so that you can use this basic template for other projects
with the same specs). When done click save template.


Next go to the first page and set your source directory (where your avs files
are), target directory (where you will save your m2v
video files), and bitrate (if you didn't add that to the template). Then click
either "Open Template" (if you entered the bitrate on the front page) or "Open
Template with Bitrates in INI File" (if you added the bitrate to your template).


Now since we are going to do a pal to ntsc conversion we will go to the
batchDGpulldown page. This is a pretty easy setting as all there is to set is
the directory you want to save the converted files to and then select the fps
conversion button ( in this case 25.00 --> 29.97).


Finally you need to set up the audio. First select your AC3 output directory.
Next add dithers if needed (leave at zero if unsure). Your sampling rate will be
resampled to 48k by ssrc for you automatically. Next select your AC3 bitrate.
Next select whether this will be a 2 channel encode, Upmix from 2 channel to 5.1
channel, or a 5.1 channel encode. Finally all that is left is to go to the first
page and press the "Start Your Batch Process" button.


Your files will now be processed by HCenc, Wavi, ssrc, and aften. Throughout the
process you will see a dos box show up on the task bar.
DO NOT close that box because it will terminate your batch.
When you no
longer see a dos Box on the task bar the process is finished. You can now author
the encoded files to dvd with your favorite dvd authoring program.

How to convert all video formats to DVD using ConvertXToDVD


The top program in our downloads database,
based in number of times downloaded, is no
other than DivXToDVD. Now you may ask why I
mention that in this guide! Well the reason
is no other than the fact that

ConvertXToDVD
is VSO Software's premium
conversion software, replacing DivXToDVD
which has ceased development.

What does it
offer? Improved speed, support of dozens of
formats (including avi, mpg, mov, wmv, mkv,
ogm and more!), menu and subtitles support,
build-in DVD burner, DVD to DVD copy, DV
(digital camera format) to DVD conversion,
both NTSC and PAL formats and conversion
between them. And all these in a
user-friendly yet powerful enviroment we
will clarify in this guide. Before you ask,
yes I do believe its the best all-to-DVD
converter out there, and I've tried many,
from the freeware to the most expensive one.


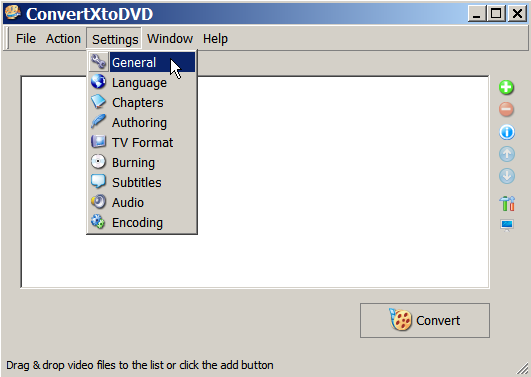
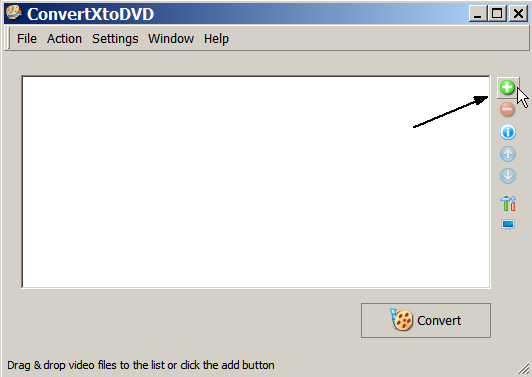
This is the main ConvertXToDVD
windows. May seem a little too basic
now but you'll soon see how
efficient it can be. For the
beginning lets go to Settings ->
General.


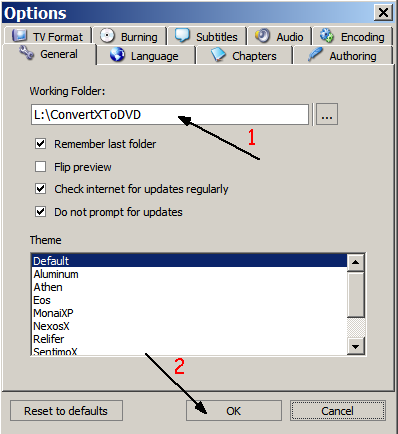
What we will set here is the working
folder, which is the folder that
ConvertXToDVD will save the DVD
files before burning them to a DVD.
Make sure that the drive that the
folder is in has at least 5GB free
and set the working folder. (1)
We will set the rest of the settings
in the next steps, so for now click
OK. (2)


We are back to the main windows and
its time to add some file to our
DVD. Click the add button and select
the file or files you want to
convert.


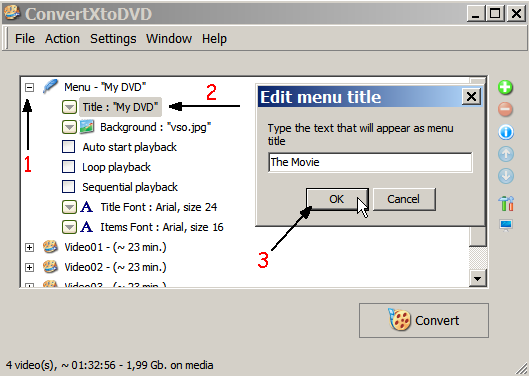
The files are now added as you
see, however we will deal with
their settings later. First
comes the DVD's menu. Click the
little cross (1) to
reveal all options for the Menu
item. Lets see the options one
by one. First you can set the
DVD title that will appear on
the top of the menu by
double-clicking on it (2)
and setting the name (3).
Next, you can set the background
image by double clicking on
Background
and select the
image you want to use (there are
many nice one in ConvertXToDVD's
folder and you can use any of
your own pictures you want).


Auto start playback
will auto-begin playing the
first video when you enter the
DVD in the player instead of
showing the menu, Loop
playback
can be used if you
want the DVD to repeat playback
indefinitely by default and
Sequential playback
will
play all videos in a row instead
of returning back in the menu.
The two font settings can be
used to set the font and size of
the menu's Title and Items.


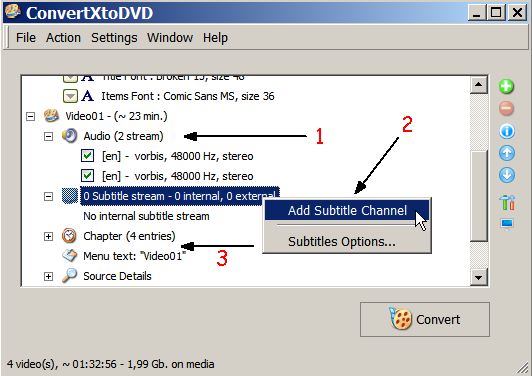
Right next comes the video
properties. First you can see that
the audio of each video has been
automatically imported (1)
as ConvertXToDVD supports almost all
formats. But you can also add you
own audio (for example commentary)
by right-clicking on Audio and
selecting Add Audio Channel. You can
also click on each audio channel and
set the language. Then we move to
the subtitle settings. Right click
on 0 Subtitle Stream and select
Add Subtitle Channel (2)
in
order to add as many subtitle
streams as you like. After you add
them you can set the language and
font size settings. Please note that
if the subtitles are in the same
desktop and have the same filename
as the video they'll be
automatically added. Finally you can
review the Chapters and add
more if you like as well as change
the Menu text which is what
will appear in the main menu as the
title of this video. Follow the same
steps to configure all your videos
and move to th next step.


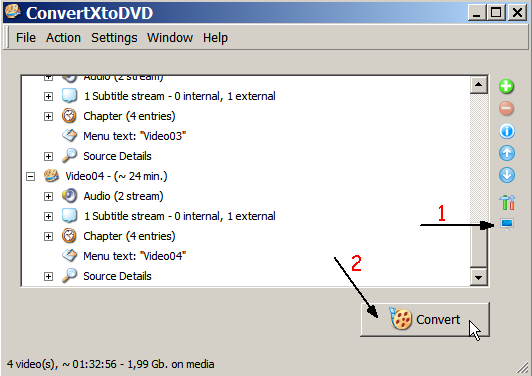
We are finally ready to convert. You
may want of course to preview your
DVD before you start converting. To
do that click the Preview button
(1)
and you can take a look at
the whole DVD, including the menus.
When you decide you are satisfied
with the result click Convert
(2)
to start the converting
process! Make sure you put an empty
DVD in your DVD burner drive as
well.


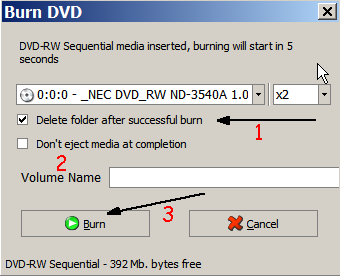
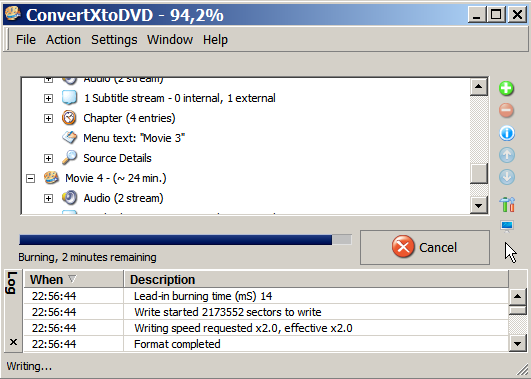
When the conversion has finished a
window like this will pop-up where
you can select some settings about
the burning (1) and change the
volume name (2). When you are done
click Burn (3). Keep in
mind that this window will only be
open for about 30secs since the
conversion finishes and if you are
not around it will start burning the
DVD automatically so you don't
really have to worry about this step
as the default settings are fine.


Finally burning finishes and your
new DVD is ready for your player!